2023 調整 Chrome 設定方法
目前 Chrome 版本,防止自動重新載入分頁的方法已經比較簡單,請見下圖:

- Mar 29 Wed 2023 22:01
2023 年防止 Chrome 自動重新讀取分頁內容
- Mar 27 Mon 2023 23:25
Cpanel WHM 如何關閉PHP ERROR LOG

- Mar 14 Tue 2023 21:38
openvino 如何run demo application & pretrained model 介紹
OpenVino概念
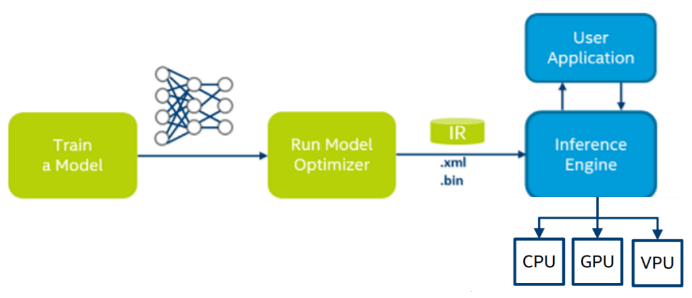

圖改自https://www.learnopencv.com/using-openvino-with-opencv/#openvino-opencv
將已經訓練好的深度學習model經過Model Optimizer優化後
(何謂優化請見下面Model Optimizer條目)
經由Inference Engine 跟 硬體(CPU/ GPU /VPU)
達到加速Inference 的目的
★ Model Optimizer
●摘錄自:【AI_Column】運用 Intel OpenVINO 土炮自駕車視覺系統
協助去除已訓練好的模型中的冗餘參數,並可將 32bits 浮點數的參數降階,
以犧牲數個百分點正確率來換取推論速度提升數十倍到百倍。
●把深度學習框架Train出來的model, 轉換成 Inference Engine 可以用的IR file
目前支援的深度學習框架有 Caffe*, TensorFlow*, MXNet*, and ONNX*.
●之前以為所有由Caffe*, TensorFlow*, MXNet*, and ONNX* 訓練出的model
都可以由Model Optimizer轉換成IR file ,但看了 的Supported Models章節
好像不是這麼一回事,需找一個底下沒提到的model來實驗看看
有結果我再更新
Supported Models
For the list of supported models refer to the framework or format specific page:
• Supported Caffe* models
• Supported TensorFlow* models
• Supported MXNet* models
• Supported ONNX* models
• Supported Kaldi* models
●有script可以 configure Model Optimizer 以導入
所有OpenVino supported的深度學習框架或單一深度學習框架
若要手動configure Model Optimizer也有文件可以參考 -> Model Optimizer Developer Guide.
★ IR file
包含train model的topology 跟weight,使用者只要知道怎樣將
訓練好的model change to IR file,就可以使用OpenVino加速Inference
★ Inference Engine
用來run 最佳化後的深度學習model
C:\Program Files (x86)\Intel\openvino_2021.4.689\
deployment_tools\inference_engine\samples底下有放一些IE的samples
各Samples說明
延伸閱讀 → 如何run Inference Engine Samples
★ VPU plugin
這份文件好像在講怎樣的model能被vpu 支援
■OpenVino不提供Model Training
OpenVino的model來源以我的理解就以下這幾種
1.自己用OpenVino supported的深度學習框架去train model
或去Model Zoo下載所需model
1. Caffe [ Model Zoo ]
2. Tensorflow [ Model Zoo ]
3. MxNet [ Model zoo ] 連結失效
4. Open Neural Network Exchange (ONNX) [ Model zoo ]
2.OpenVino裡面附的pre-trained model
不過不一定有符合你需求的
3.OpenCV DNN sample model
■相關名詞
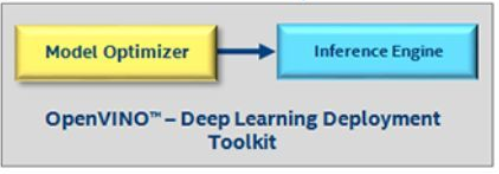
★ OpenVino用的是CNN( Convolutional Neural Networks )模型 ;
還包含了Deep Learning Deployment Toolkit (Intel® DLDT).

Convolution:影像->filter->擷取出特徵,比如邊緣。
此種過程叫做Convolution
★ OpenCV和OpenVX有什么联系和区别?
★ 機器學習
機器學習理論主要是設計和分析一些讓電腦可以自動學習的演算法。
機器學習演算法是一類從資料中自動分析獲得規律,並利用規律對未知資料進行預測的演算法。
★ 深度學習
是機器學習的分支。 深度學習框架比較
■如何安裝OpenVino
照著 安裝步驟做即可 (英文看不懂請自行克服)
-------------------------------------------------------------------------------------------------------------------------------
上述的東西都了解之後,接下來開始DEMO OpenVino附的兩個script
■Run the Image Classification Verification Script
★在C:\Program Files (x86)\IntelSWTools\openvino\deployment_tools\demo下
可以找到demo_squeezenet_download_convert_run.bat。
這個demo使用squeezenet model 判斷照片中的Object屬於什麼類別
可判斷的類別有一千種,有哪一千種可以看底下這個檔案
C:\Program Files (x86)\Intel\openvino_2021.4.689\
deployment_tools\demo\squeezenet1.1.labels
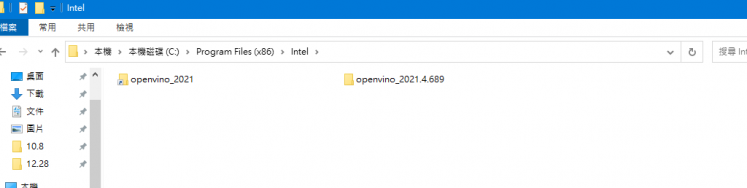
*路徑中的openvino_2019.1.148的2019.1.148這數字代表版本, 因此若安裝的OpenVino版本跟我不同,那數字也會不同
*若安裝不只一個版本的OpenVino,不同版本的OpenVino會有屬於自己的資料夾
而openvino那個捷徑會指向最後安裝的那個版本

★這個batch的內容如下
Step1 : 下載SqueezeNet model (使用downloader.py)
Step2: 用 Model Optimizer 把SqueezeNet轉成IR file。
(使用mo.py)
Step3: Build Inference Engine samples
batch檔執行過程中, 會看到cmd 畫面卡在
Build Inference Engine samples using MS Visual Studio (MSBuild.exe)一段時間
請耐心等候 。此步會產生 classification_sample.exe
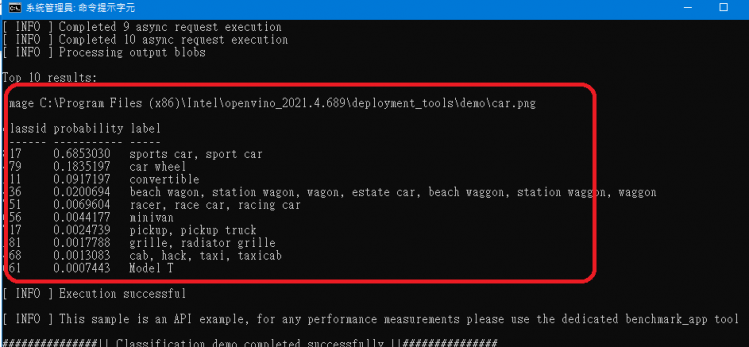
Step4: 把car.png & IR file當作iInference Engine的input 來分析car.png
↓This is car.png
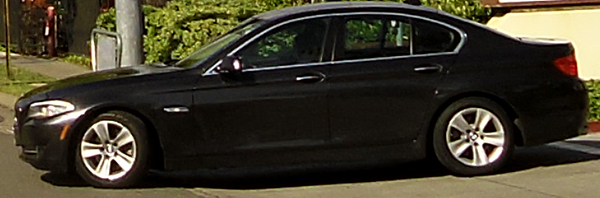

↓針對照片中的Object,分類前十名的結果依序從Prob.高到低排列
分類結果最高分數是sport car

★重跑demo_squeezenet_download_convert_run.bat
跑過一次batch之後,若再執行一次batch,
因為某些檔案跑過一次batch之後就已經存在了
batch裡的寫法偵測到某些檔案存在之後就會忽略掉某些Step
若想要完整地再跑一次,需刪除以下檔案
●刪除model
C:\Users\$(username)\Documents\Intel\OpenVINO\openvino_models
\models\FP32\classification
底下整個squeezenet 資料夾刪掉
注意:FP32是針對CPU device的,若是VPU devide ,對應到的folder name是FP16
●刪除 IR
C:\Users\$(username)\Documents\Intel\OpenVINO\openvino_models\ir\FP32
\classification\squeezenet\1.1\ 底下整個caffe 資料夾刪掉
注意:FP32是針對CPU device的,若是VPU devide ,對應到的folder name是FP16
------------------------------------------------------------------------------------------------
■Run the Inference Pipeline Verification Script
★demo_security_barrier_camera.bat 這個batch的內容如下
Step1 : 下載 three pre-trained models IRs
Step2:build Security Barrier Camera Demo Inference Engine來分析car1.bmp
Step3: 圖片裡的object會被第一個model判斷成是車輛,
這個判斷結果被當作input 導入到下一個model,
這個model可以指出車輛的一些屬性 ex:車牌
最後 車牌被當作input導入到第三個model,這個model可以把車牌的字元識別出
會被稱做Pipeline 我想應該是識別結果從第一個model傳到第三個model
像水流在管線裡流動一樣吧...
★重跑整個bat
跑過一次batch之後,有些step會被忽略掉,因為某些檔案已經存在了
若要乾乾淨淨的再跑一次,需要刪除以下檔案
●刪除 IR
C:\Users\$(username)\Documents\Intel\OpenVINO\openvino_models\
ir\FP32\classification\squeezenet\1.1\
底下整個caffe 資料夾刪掉
----------------------------------------------------------------------------------------------------------
以上範例是使用openvino在 CPU
若用其他intel 硬體, 比如movidius gpu vpu FPGA or MYRIAD
請參考安裝文件中 Optional Steps這部份
-----------------------------------------------------------------------------------------------------------
■OpenVino PreTrained Model
★OpenVINO提供好幾個pre-trained models
可以用Model Downloader 或到
https://download.01.org/opencv/2019/open_model_zoo/ 去下載
下載的model是被優化過的model,稱作IR file( xml 檔+ bin 檔)
★可在這邊 https://docs.openvinotoolkit.org/latest/_demos_README.html
Demos that Support Pre-Trained Models章節
看各個pre-trained model support哪些Device
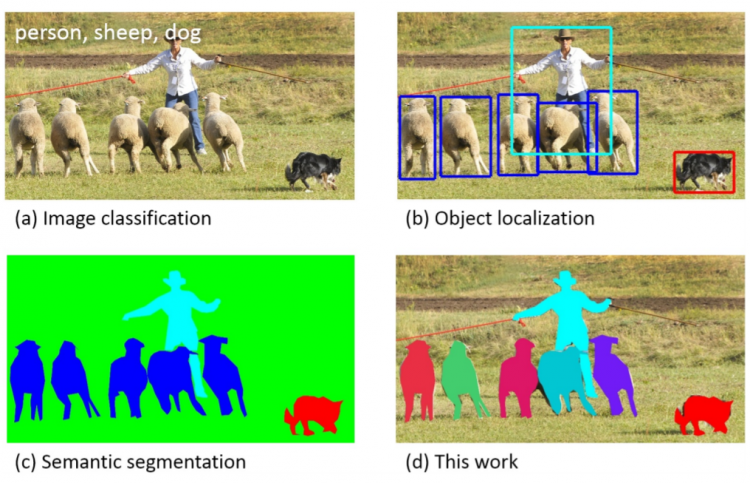
Object Detection Models
裡面包含好幾個model可以用來偵測object
包含:人臉,人,車輛
Object Recognition Models
用來分類或特徵辨識,使用在其他detector之後。比如先做人臉偵測,再做年齡/性別辨識
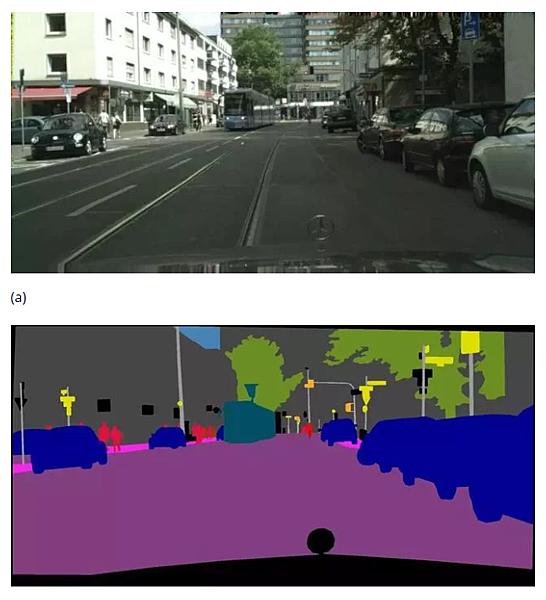
Semantic Segmentation Models
原文網址:https://kknews.cc/zh-tw/tech/mgqvl9.html
語義分割(Semantic Segmentation)的目標是給定一張圖片,對於圖片中的每一個像素做分類。
例如圖1(a)中給出的原始輸入圖片,語義分割算法對圖片中的每一個像素分類,
得到如圖1(b)的結果。在圖1(b)中,不同顏色代表不同類別:
如紅色代表行人,藍色代表汽車,綠色代表樹,灰色代表建築物等。
語義分割問題在很多應用場景中都有著十分重要的作用(例如圖片理解,自動駕駛等)

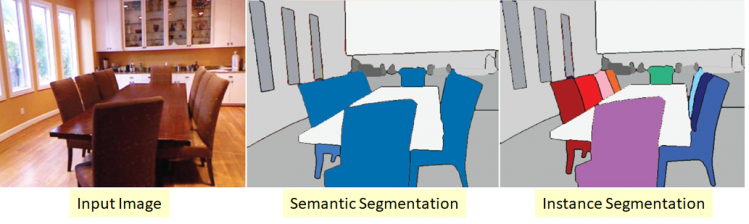
Instance Segmentation Models
INSTANCE SEGMENTATION可以知道同類object的數目(不同顏色表示)
https://arxiv.org/pdf/1405.0312.pdf


Human Pose Estimation Models
Image Processing
提高影像品質

Text Detection
Action Recognition Models
-------------------------------------------------------------------------------------------------------------------------------------------------------------------------
■Trouble Shooting
● 安裝時遇到CMake*/ Python* version xxx or higher is not detected.


->Fixed by 安裝如提示的CMake & Python版本後
再重安裝一次OpenVino
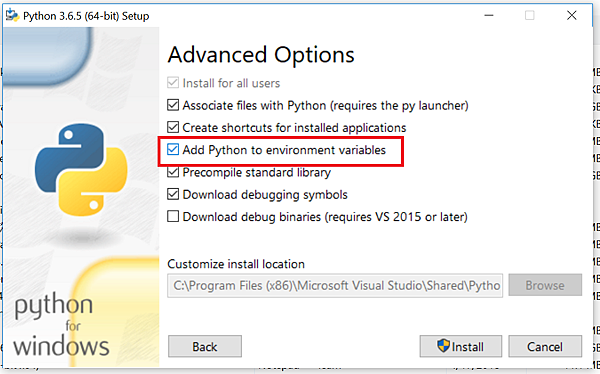
● 電腦已經有安裝Python3.6.5了
還是會出現Python* version xxx or higher is not detected.
->Fixed by 再安裝一次Python >選Modify >勾選Add Python.....
->再安裝一次OpenVino就可以了

● 執行demo_squeezenet_download_convert_run.bat前
若沒有安裝cmake 會出現以下Error
'cmake' is not recognized as an internal or external command,
operable program or batch file.
->Fixed by 安裝cmake
請參考 Install CMake* 3.4 or higher章節
● 執行demo_squeezenet_download_convert_run.bat發生以下Err
target_precision = FP32
Python 3.6.6
ECHO is off.
PYTHONPATH=C:\Program Files (x86)\IntelSWTools\openvino\python\python3.6;
[setupvars.bat] OpenVINO environment initialized
INTEL_OPENVINO_DIR is set to C:\Program Files (x86)\IntelSWTools\openvino
Python 3.6.6
ECHO is off.
Collecting pyyaml
Retrying (Retry(total=4, connect=None, read=None, redirect=None, status=None)) after connection broken by 'ProxyError('Cannot connect to proxy.', OSError('Tunnel connection failed: 407 Proxy Authentication Required ( Forefront TMG requires authorization to fulfill the request. Access to the Web Proxy filter is denied. )',))': /simple/pyyaml/
...
Could not find a version that satisfies the requirement pyyaml (from versions: )
No matching distribution found for pyyaml
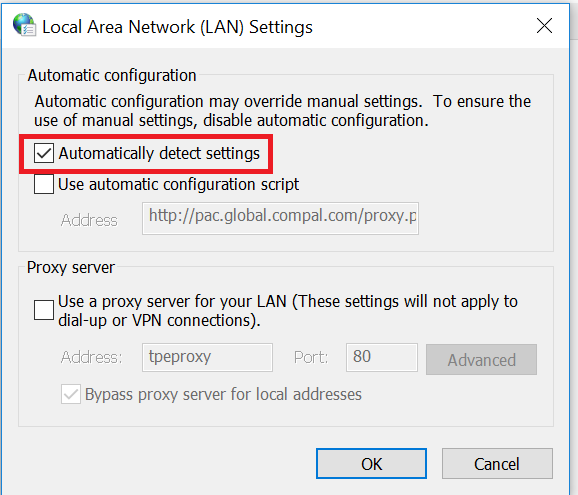
->Fixed by 更改proxy設定
根據Cannot connect to proxy這個訊息判斷應該是proxy問題
原本我是使用公司內網run script
後來將proxy調整成以下設定&連手機熱點就可以執行了

● 出現以下Error
###############|| Generate VS solution for Inference Engine samples using cmake ||###############
Waiting for 2 seconds, press a key to continue ...
Creating Visual Studio 15 2017 x64 files in
C:\Users\$(userName)\Documents\Intel\OpenVINO\inference_engine_samples_build...
CMake Error at CMakeLists.txt:7 (project):
Generator
Visual Studio 15 2017
could not find any instance of Visual Studio.
-- Configuring incomplete, errors occurred!
->fixed by reboot
因為在安裝openvino之前我有開visual studio installer去 modify設定
設定完後沒有按照指示重開機
因此出現以上issue
-------------------------------------------------------------------------------------------------------------------------------------------------------------------------
●其它參考連結
- OPENvINO with openCV
- 既跨平台又開源 英特爾開啟智慧視覺創新
超過20個預先訓練的模型,以及針對OpenCV和OpenVx的最佳化電腦視覺庫。
OpenVINO工具套件可透過CPU、GPU、FPGA、Movidius VPU(AI晶片 )等硬體進行部署,
增強視覺系統功能和性能
- SqueezeNet
SqueezeNet 是圖片分類模型,最適合參數較少及較小的模型使用,相較於現代圖片分類模型 (AlexNet),
不會犧牲品質。
- C:\Program Files (x86)\Intel\openvino_2021.4.689\documentation
- Feb 24 Fri 2023 23:18
Python 利用 OpenCV抓取相片中的臉部數據
為了將圖片數據轉換為適合 AI訓練的格式,利用 OpenCV先對臉部進行辨識,然後將臉部數據另存為統一的格式。
- Feb 22 Wed 2023 23:06
【Python 爬蟲】抓取 Google 搜尋結果的連結
記錄一下批量抓取 Google 搜尋結果裡的連結的方法。
如果還沒有安裝以下,要先下載安裝:
- Feb 21 Tue 2023 12:15
如何在安卓模擬器上安裝WINDOWS 10
- Feb 15 Wed 2023 16:51
Python 使用 MySQL Connector 操作 MySQL/MariaDB 資料庫教學與範例

介紹如何使用 Python 的 MySQL Connector 模組連接 MySQL/MariaDB 資料庫,進行查詢、新增或刪除等各種操作。
Python 有許多 MySQL/MariaDB 資料庫相關的模組,而最常被使用的就是 MySQL Connector 與 MySQLdb 這兩個模組,以下是 MySQL Connector 模組的使用方式。
安裝 MySQL Connector 模組
開啟 Windows 中的命令提示自元,使用 pip 安裝 Python 的 MySQL Connector 模組:
- Feb 15 Wed 2023 16:45
Python爬蟲學習之使用BeautifulSoup庫爬取開獎網站信息-模塊化
實例需求:運用python語言爬取http://kaijiang.zhcw.com/zhcw/html/ssq/list_1.html這個開獎網站所有的信息,並且保存為txt文件和excel文件。
實例環境:python3.7
BeautifulSoup庫、xlwt庫(需手動安裝)
urllib庫、re庫(內置的python庫,無需手動安裝)
BeautifulSoup庫、xlwt庫(需手動安裝)
urllib庫、re庫(內置的python庫,無需手動安裝)
- Feb 13 Mon 2023 20:02
使用 pytube4 下載影片
完成圖

安裝模組
- Feb 09 Thu 2023 18:49
JAVA 如何在LINUX COPY files時出現PROCESS圖標
有使用過進度條的朋友一定會覺得很不方便
因為要從0~100讀取 浪費時間
因檔案大小也不知道這時間讀寫的完嗎?
如這篇
Java Swing 如何使用進度
於是經過修正
改成此方法
可利用DIALOG準確的抓到讀寫完成的時間


