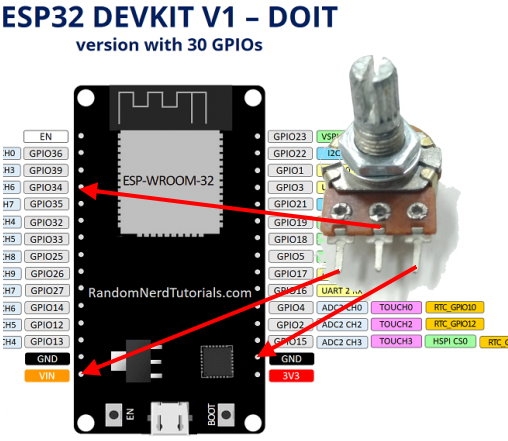
ESP32 腳位34 連接到可變電阻腳位 2
ESP32 腳位VIN 連接到可變電阻腳位 1
ESP32 腳位GND 連接到可變電阻腳位 3

讀取數值為12 bits = 4096
0 - 4095
程式碼:
- const int potPin = 34;
- int val=0;
- void setup() {
- Serial.begin(115200); //連線速率
- delay(1000);
- }
-
- void loop() {
- // put your main code here, to run repeatedly:
- val = analogRead(potPin); //讀取電壓數值
- Serial.println(val); //印出電壓數值
- delay(500); //延遲0.5秒
- }
NetYea 網頁設計 發表在 痞客邦 留言(0) 人氣()
|
ESP32 腳位 34 對應10K歐姆電阻與光敏電組連接處
ESP32 腳位 27 對應LED 正極
10K歐姆電阻另一腳接VCC
LED腳負極接地
光敏另一腳接地
光敏電阻與10K歐姆電阻連接
如圖:

|
NetYea 網頁設計 發表在 痞客邦 留言(0) 人氣()
影片
伺服馬達接線圖
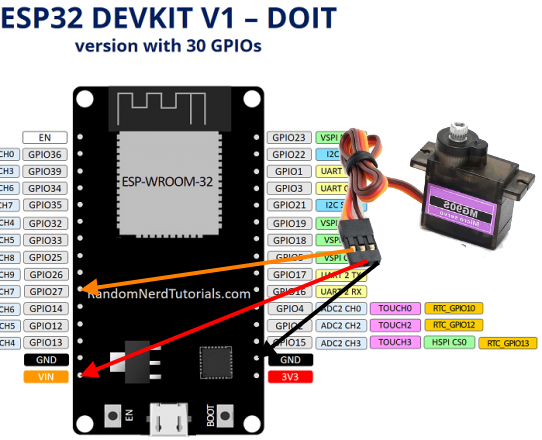

黃線 接 GPIO27 、 紅線 接 5V 、 黑線 接 GND
ESP32 電力只能推動一個馬達,如果要推動兩個馬達就要外接電源了
程式碼
- #include <Servo.h>
- Servo myservo; // 建立伺服馬達控制
-
- // 伺服馬達的連接 GPIO
- static const int servoPin = 27;
- int pos = 0;
- void setup() {
- // put your setup code here, to run once:
- myservo.attach(servoPin); // 將伺服馬達連接的GPIO pin連接伺服物件
- Serial.begin(115200);//序列阜連線速率
- }
-
- void loop() {
- // put your main code here, to run repeatedly:
- if(Serial.available()){ //
- int num = Serial.parseInt(); // case 前置 num(數字鍵)
-
- switch(num) { //
-
- case 1 : //1~9
- for(pos = 0; pos < 180; pos += 1) // 一度一度由 0 度旋轉到 180 度
- myservo.write(pos);
- delay(200);
- break;
-
- case 2 : // 1~9
- for(pos = 180; pos>=1; pos-=1) // 一度一度由 180 度旋轉到 0 度
- myservo.write(pos);
- delay(200);
- break;
- }
- }
- }
NetYea 網頁設計 發表在 痞客邦 留言(0) 人氣()
學會Arduino基本操控後
一定會想學會無線遙控,如藍芽Bluetooth, Wifi
這篇說明藍芽Bluetooth操控
結果圖

影片
代碼:
NetYea 網頁設計 發表在 痞客邦 留言(0) 人氣()
影片
TB6612FNG是東芝生產的馬達驅動與控制IC,內部包含兩組H橋式電路,可驅動和控制兩個小型直流馬達,或者一個雙極性步進馬達。

NetYea 網頁設計 發表在 痞客邦 留言(0) 人氣()
ESP32 控制 TB6612FNG 直流馬達驅動∕控制板 請看這篇
使用Android手機如何用Arduino藍芽連線ESP32控制蜘蛛機器人
需要使用雙電源
如果使用單電源,電流會被馬達抽走
ESP32晶片電流不足會無法正常運作
NetYea 網頁設計 發表在 痞客邦 留言(0) 人氣()
最近電腦重灌WIN10
arduino重新安裝及設定
發現輸入開發管理員網址時會出現錯誤
- https://dl.espressif.com/dl/package_esp32_index.json
NetYea 網頁設計 發表在 痞客邦 留言(0) 人氣()
首先可以到FPDF網站下載程式,當然FPDF的網站有教學也值得前往觀看http://www.fpdf.org/
或直接點選這邊下載fpdf16.zip
NetYea 網頁設計 發表在 痞客邦 留言(0) 人氣()
sqlite3的名擴展在PHP 5.3.0+以上都會默認啟用。在可以compile-時使用--without-sqlite3來禁用它。
視窗柯林斯用戶通過啟用php_sqlite3.dll才能使用此擴展。php_sqlite3.dll默認所有遊戲在PHP 5.3.0之後的PHP發行版中。
有關詳細的安裝說明,請查看PHP教程及其官方網站。
連接到的SQLite數據庫以下PHP代碼顯示如何連接到SQLite數據庫。如果數據庫不存在,那麼它將創建一個新的數據庫,最後將返回一個數據庫對象。
- <?php
- class SQLiteDB extends SQLite3
- {
- function __construct()
- {
- $this->open('phpdb.db');
- }
- }
- $db = new SQLiteDB();
- if(!$db){
- echo $db->lastErrorMsg();
- } else {
- echo "Yes, Opened database successfully\n";
- }
- ?>
NetYea 網頁設計 發表在 痞客邦 留言(0) 人氣()
有時候會需要寫PHP程式去取得指定資料夾內的檔案列表,這三個函式分別是glob、scandir、readdir
NetYea 網頁設計 發表在 痞客邦 留言(0) 人氣()